
To read a pen test report, start with the executive summary for the overall risk rating and top priorities. Next, check the scope and methodology to confirm exactly what was tested and how. Follow the attack narrative to see how individual findings connect into real attack paths. Then work through each finding by its severity, affected asset, proof of concept, business impact, and fix steps. Finally, turn those findings into a remediation plan and confirm every fix with a retest.
Each part of the report speaks to a different reader, from the board to the engineers who apply the fixes. Knowing what each section contains, and who it’s written for, makes every step above faster.
What a Pen Test Report Includes
A pen test report is the written record of everything a pen tester found, proved, and recommended during an engagement. A standard pen testing report includes seven parts: an executive summary, scope and methodology, an attack narrative, detailed findings, a remediation roadmap, appendices with raw evidence, and retest results. Each part serves a different reader, so most teams pass the report around rather than reading it cover to cover.
| Report Section | What It Covers | Who Reads It |
|---|---|---|
| Executive Summary | Overall risk rating, the most serious findings, and top priorities | CEO, CFO, board, CISO |
| Scope and Methodology | Systems tested, testing dates, tester starting point, and frameworks followed | Auditors, compliance managers |
| Attack Narrative | The step-by-step path the tester took, from first access to final impact | CISO, security leads |
| Detailed Findings | Each weakness with severity, evidence, business impact, and fix steps | Engineers, developers, IT admins |
| Remediation Roadmap | Fixes grouped by priority, owner, and target date | IT managers, project leads |
| Appendices | Screenshots, request logs, tool output, and affected asset lists | Engineers verifying a fix |
| Retest Results | Confirmation of which findings are closed | Auditors, customers, leadership |
The pen test report format varies by provider, but these parts appear in almost every strong report. Some providers add a compliance mapping section that ties each finding to PCI DSS, SOC 2, or ISO 27001 requirements. Others include an attestation letter, a short summary you can share with customers and auditors without exposing technical details.
The best way to read a report is by role. A CFO can stop after the executive summary. An auditor checks scope, methodology, and retest results. An engineer goes straight to the findings for their systems. The sections below walk through how to read each part and what to look for.
How to Read the Executive Summary
To read a pen test executive summary, start with the overall risk rating, then read the worst-case attack path, check the finding counts, review the top priorities, and note the strengths. The whole read takes about five minutes and tells you how exposed the business is and where to act first.
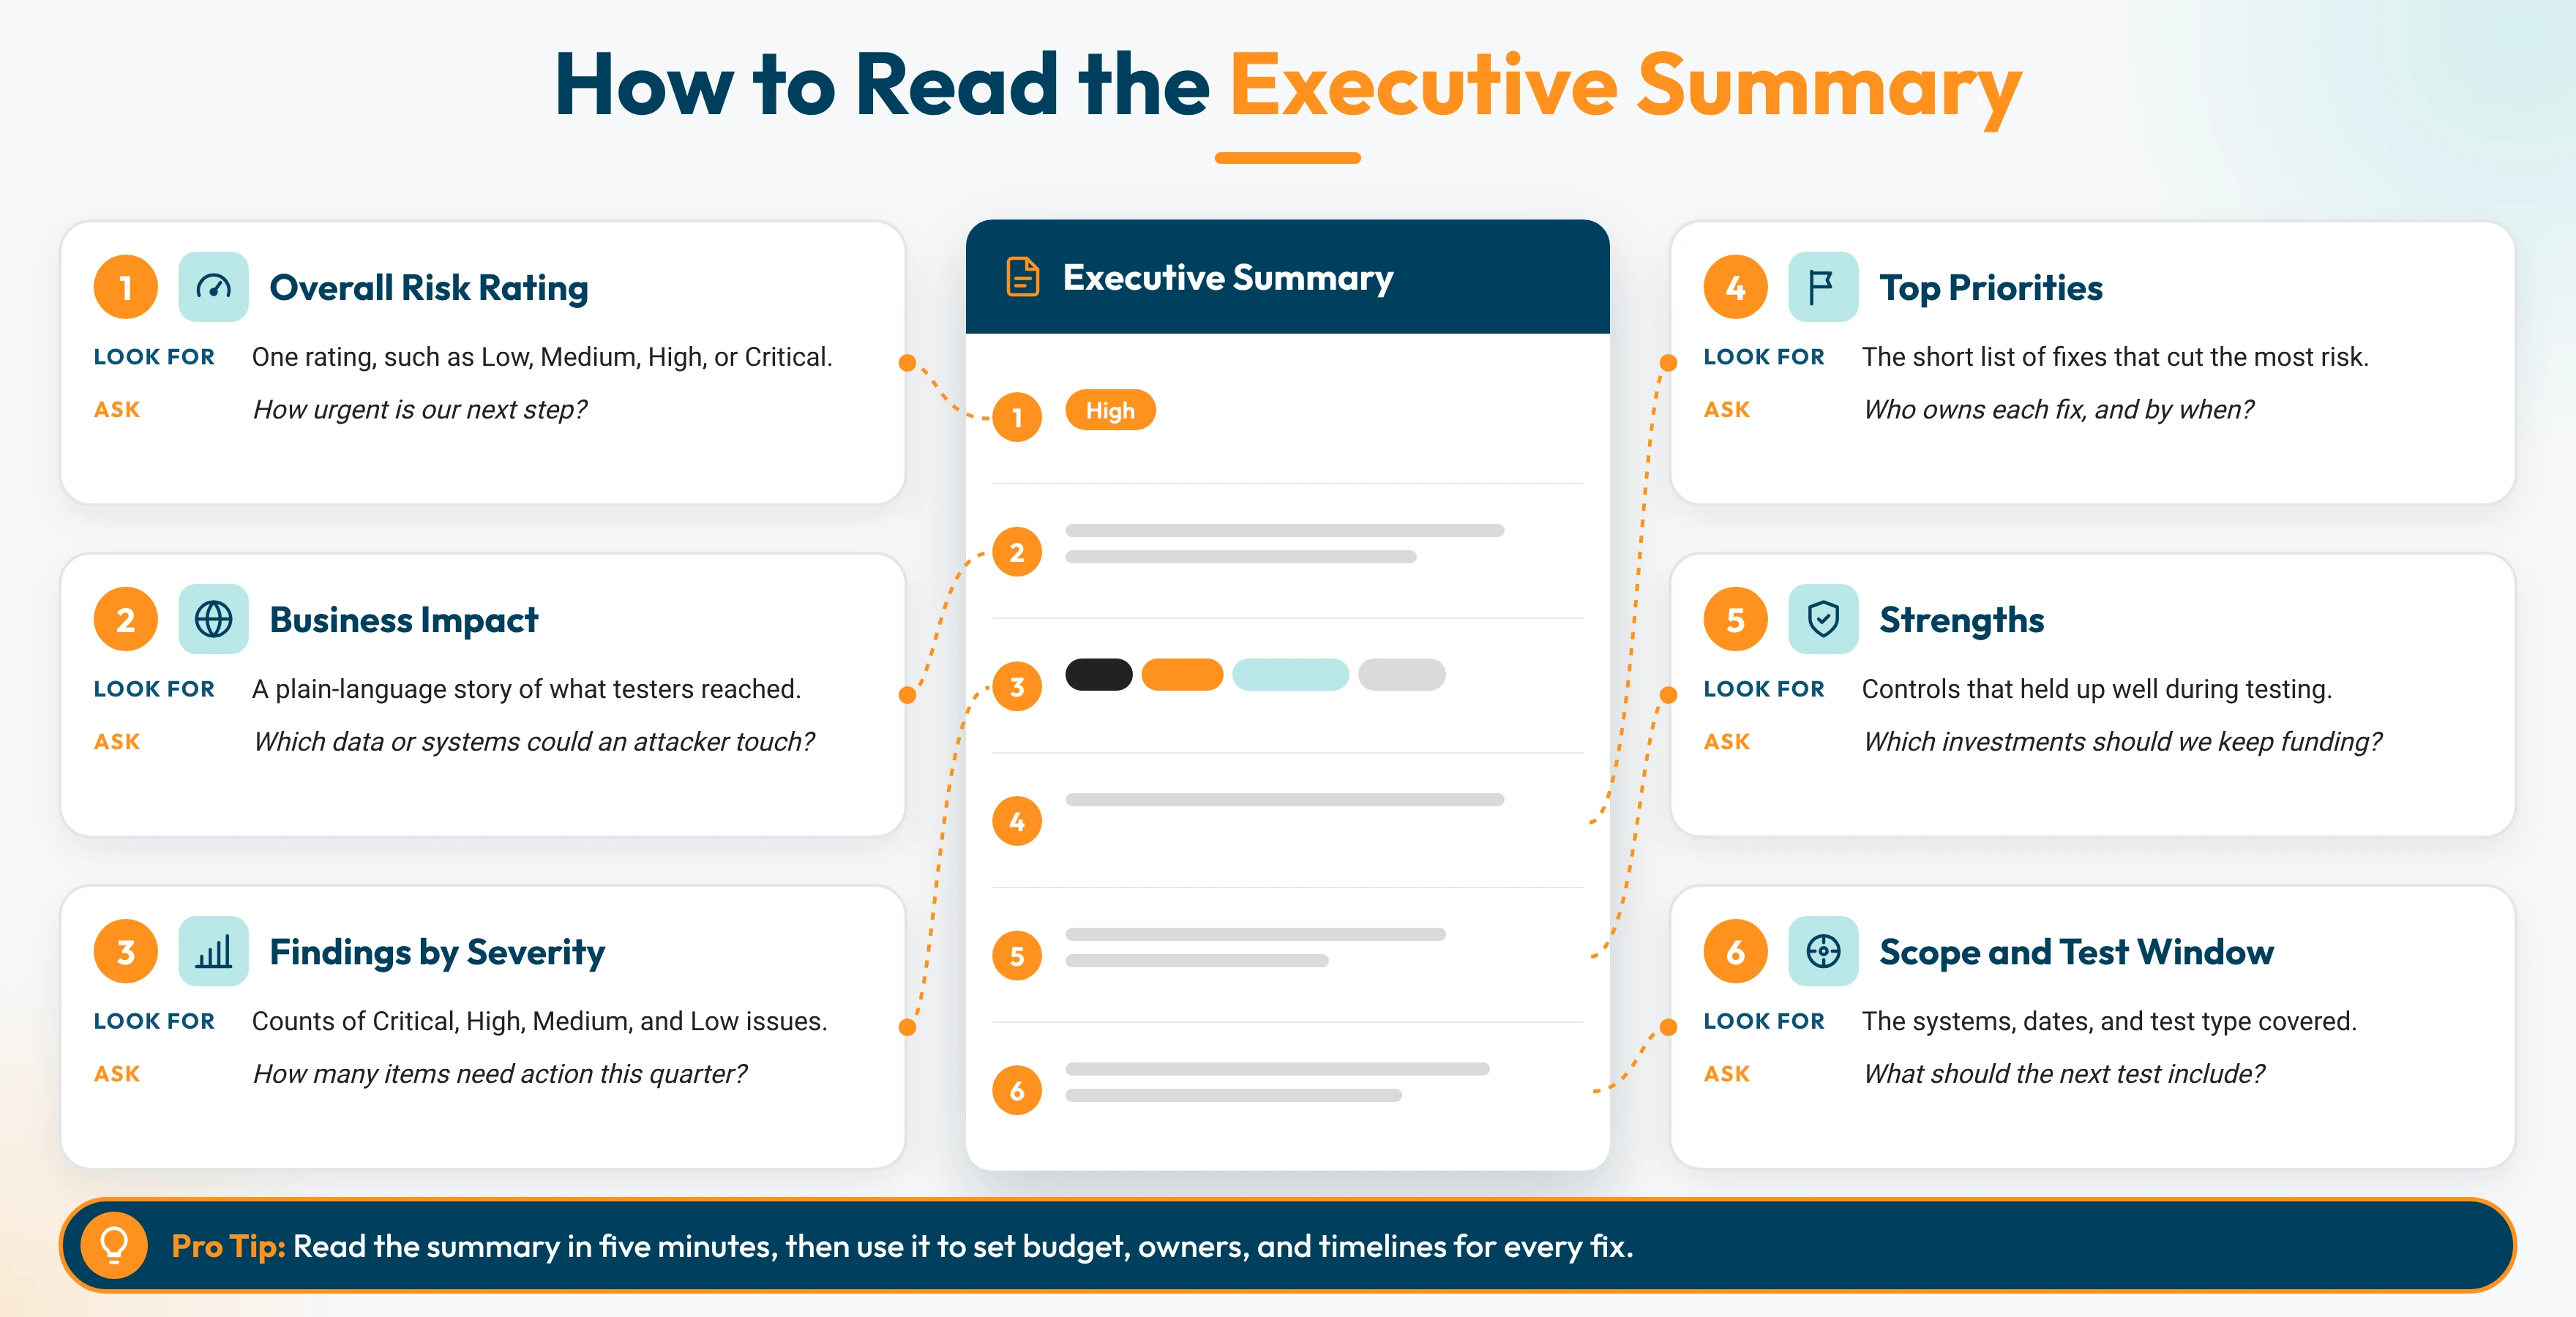
Here is how to read the executive summary step by step:
- Start with the overall risk rating. One word (Critical, High, Medium, or Low) sums up your exposure. Treat Critical or High as a signal to fund fixes this quarter.
- Read the worst-case path. Look for the sentence that says what an attacker could reach, such as “customer database” or “payroll system.” This tells you the business impact in your terms.
- Check the finding counts. The number of Critical and High findings shows how much urgent work lies ahead. Medium and Low findings usually fit into normal maintenance cycles.
- Review the top priorities. These are the fixes that close the biggest risks first. Confirm each one has an owner and a target date.
- Note the strengths. These are the controls that held up, and they show where past security spending paid off.
Pen Test Executive Summary Example
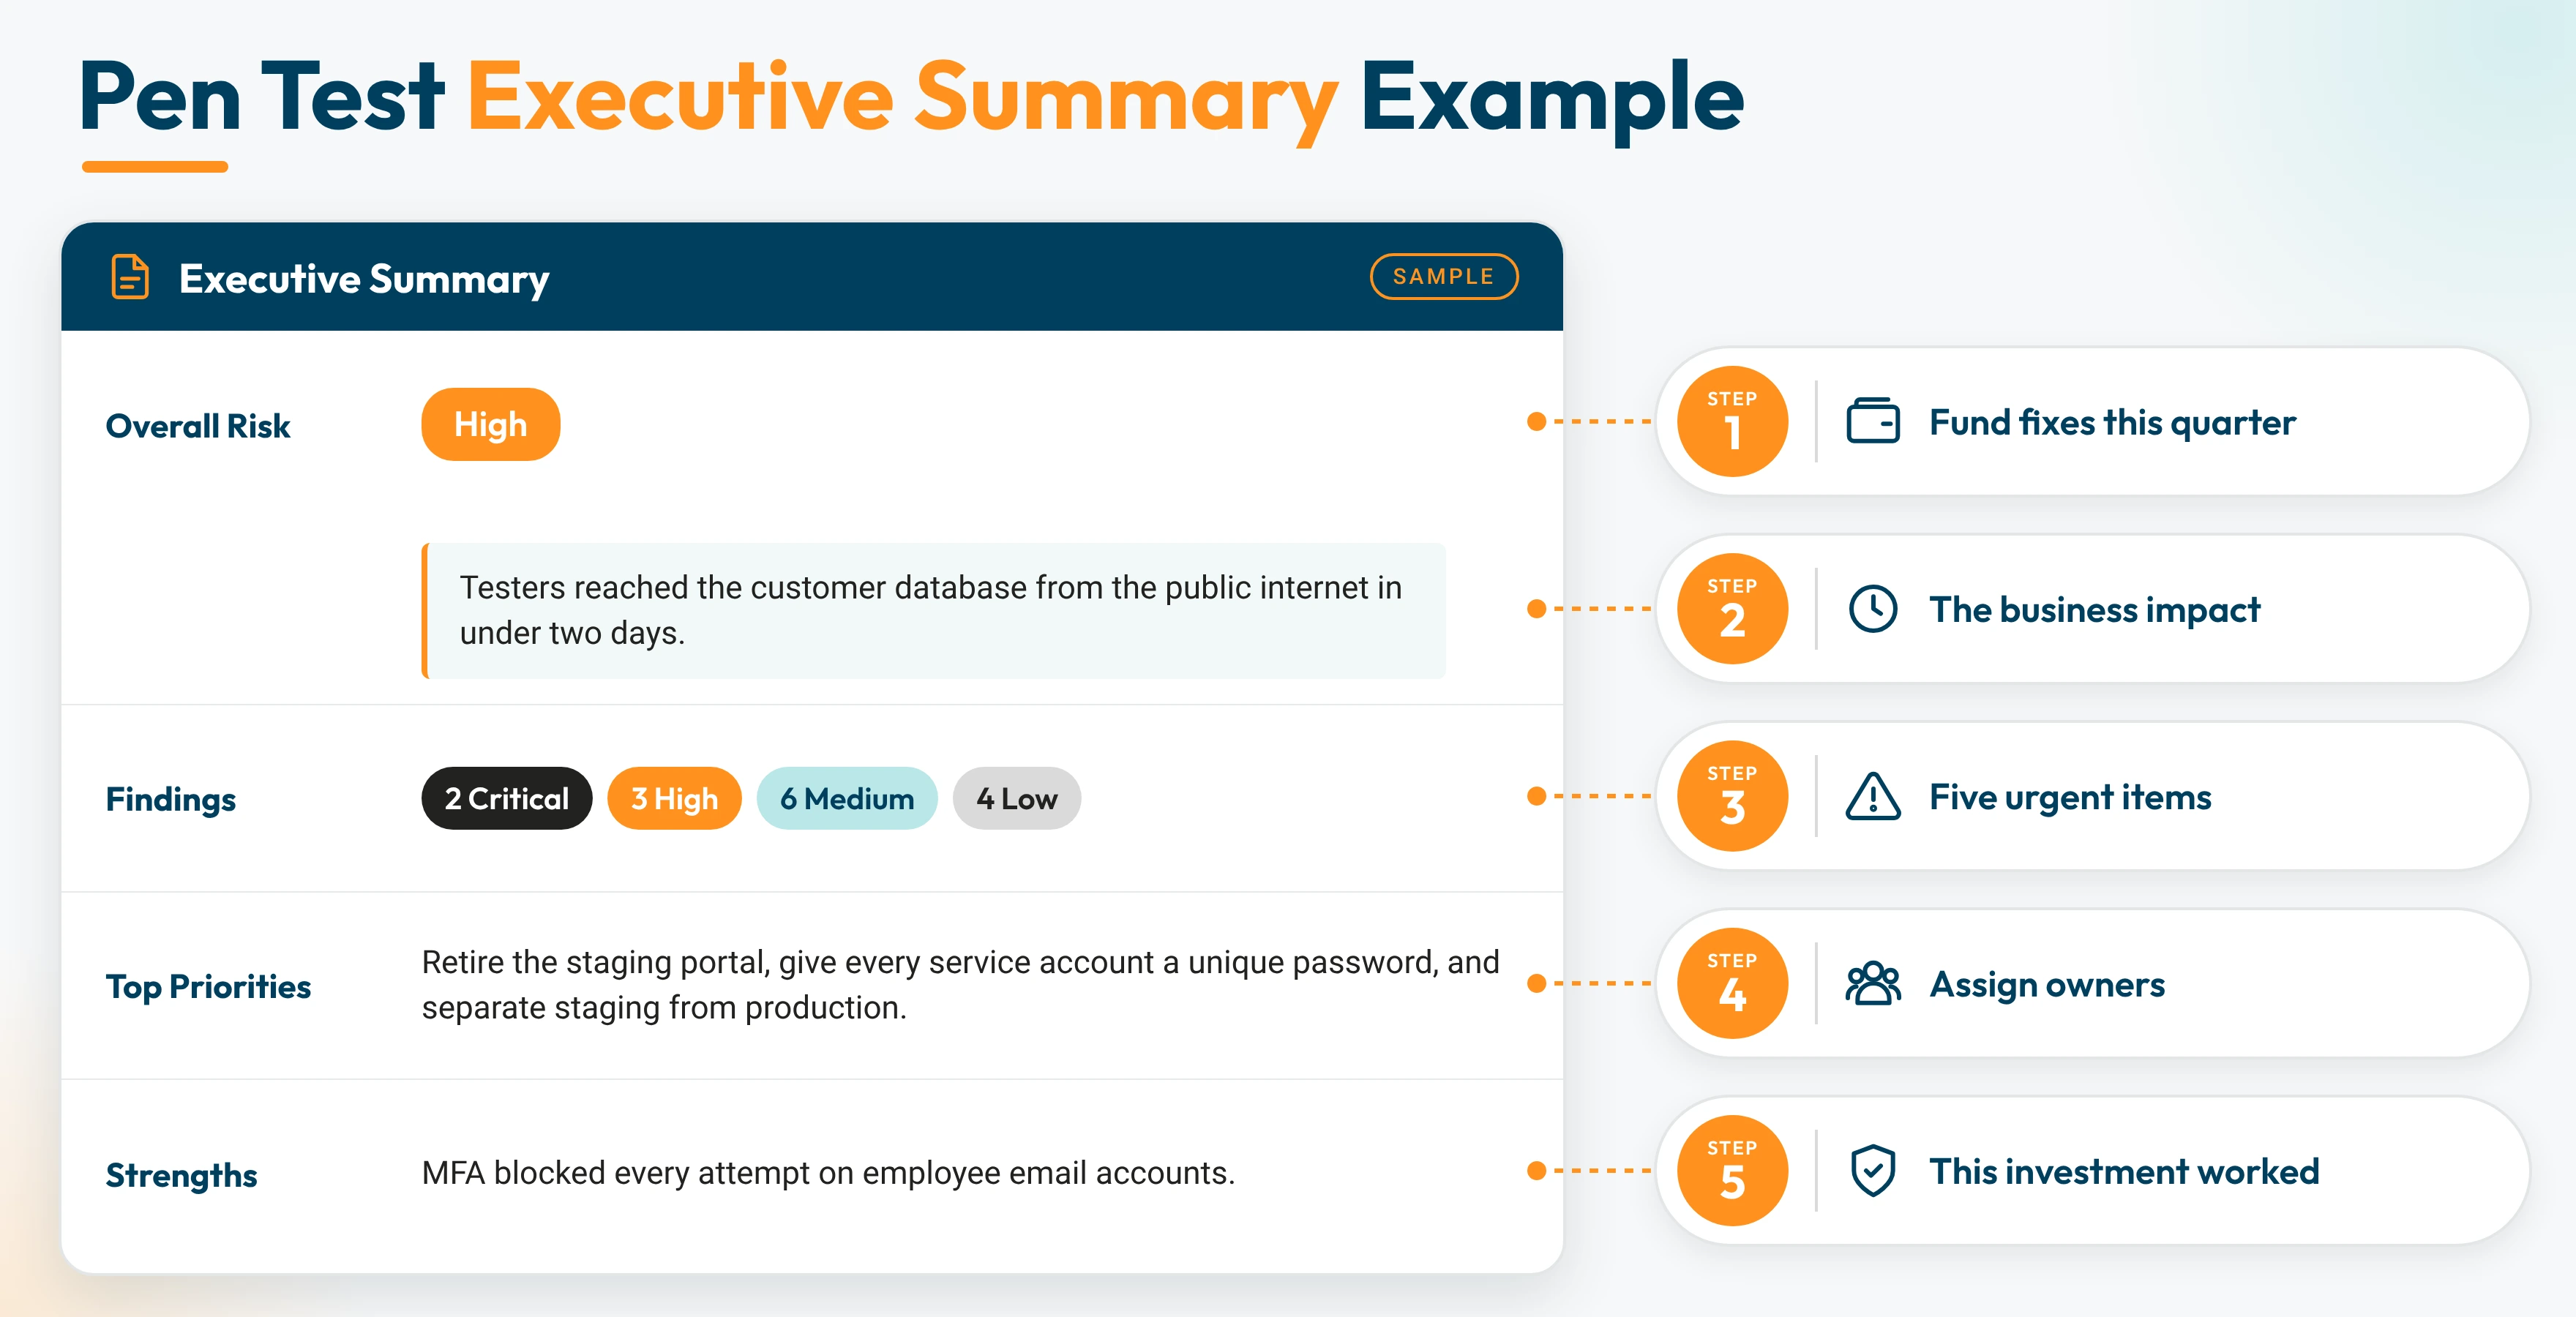
Overall Risk: High ← Step 1: fund fixes this quarter
Testers reached the customer database from the public internet in under two days. ← Step 2: the business impact
Findings: 2 Critical, 3 High, 6 Medium, 4 Low ← Step 3: five urgent items
Top Priorities: Retire the staging portal, give every service account a unique password, and separate staging from production. ← Step 4: assign owners
Strengths: MFA blocked every attempt on employee email accounts. ← Step 5: this investment worked
If any step leaves a question open, ask the provider for a readout meeting before the report goes to the board.
How to Read Technical Findings
To read technical findings, work through each finding in the same order: the title and severity, the affected asset, the proof of concept, the business impact, and the fix steps. Each of these pen test findings tells you what’s wrong, where it lives, how the tester proved it, why it matters, and exactly how to fix it.
What Each Field Tells You
Finding ID: A tracking number, like PT-03, for tickets, emails, and the retest.
Title: The flaw and its location, such as “SQL Injection in Customer Search.”
Severity: The rating and CVSS score. This sets how fast the fix needs to happen.
Affected Asset: The exact URL, IP address, server, or cloud resource. Read this first to route the finding to the right team.
Proof of Concept: Screenshots, request and response logs, and timestamps that prove the tester confirmed the flaw.
Business Impact: What an attacker could do, in business terms, such as “read every customer’s order history.”
Remediation: Specific fix steps, often with a code or configuration example.
How to Read Severity and CVSS
Most reports score each finding with CVSS, the Common Vulnerability Scoring System, on a scale from 0 to 10:
| CVSS Score | Severity | Typical Fix Window |
|---|---|---|
| 9.0 to 10.0 | Critical | Immediately |
| 7.0 to 8.9 | High | Within weeks |
| 4.0 to 6.9 | Medium | Next maintenance cycle |
| 0.1 to 3.9 | Low | Planned backlog |
Read the score, then the business impact. A High finding on your public payment page usually deserves faster action than a Critical finding on an isolated test server.
Common Pen Test Findings and How to Read Them
These findings appear in most pen test reports. Here’s what each one means and what to check when you read it.
Web Application and API Findings
| Finding | What It Means | Typical Severity | How to Read It |
|---|---|---|---|
| SQL Injection | Crafted input changes a database query | Critical to High | Check what data the proof of concept reached, such as customer records or passwords |
| Cross-Site Scripting (XSS) | An attacker’s script runs in another user’s browser | High to Medium | Note whether it’s stored (affects every visitor) or reflected (needs a crafted link) |
| Broken Access Control | A user reaches data or functions meant for another user or role | Critical to High | Look for the two roles involved, such as customer and admin, and what data crossed between them |
| Insecure Direct Object Reference (IDOR) | Changing an ID in a URL or request opens someone else’s record | High | Check whether the tester could reach one record or every record in the system |
| Broken Authentication | Login, password reset, or MFA can be bypassed or abused | Critical to High | Find which step failed (login, reset link, MFA prompt) and which accounts it affects |
| Session Management Flaws | Session tokens stay valid too long or survive logout | Medium | Check the token lifetime and whether logout ends the session on the server |
| Server-Side Request Forgery (SSRF) | The server can be made to send requests to internal systems | High to Critical | Look for which internal systems or cloud metadata the server reached |
| API Excessive Data Exposure | An API returns more data than the app displays | High to Medium | Compare the data shown on screen with the full API response in the evidence |
| Missing Security Headers | Browser protections like Content Security Policy are absent | Low | Treat as quick configuration fixes, often bundled into one ticket |
| Verbose Error Messages | Errors reveal software versions, file paths, or database details | Low to Medium | Check whether the leaked detail helped the tester in a later finding |
Network and Infrastructure Findings
| Finding | What It Means | Typical Severity | How to Read It |
|---|---|---|---|
| Outdated or Unpatched Software | A system runs a version with known, published vulnerabilities | Critical to Low | Check the CVE number listed and whether the tester actually exploited it |
| Default or Weak Credentials | Devices or apps accept factory or easily guessed passwords | High to Critical | Note the device type (printer, camera, admin panel) and what access the login gave |
| Exposed Admin Interfaces | Management panels are reachable from the internet | High | Check the URL or IP and whether a login page or full access was exposed |
| Weak Encryption in Transit | Old TLS versions or weak ciphers protect traffic | Medium to Low | Look for which services are affected and whether sensitive data travels over them |
| Privilege Escalation | A standard account gains admin rights | Critical to High | Trace the starting account and the final access level the tester reached |
| Lateral Movement Paths | One compromised system leads to others | High to Critical | Follow the chain of systems in the attack narrative to see the full path |
| Active Directory Weaknesses | Domain settings allow attackers to gain domain-wide control | Critical to High | Check whether the tester reached domain admin and which setting enabled it |
| Weak Network Segmentation | Networks that should stay separate can reach each other | High | Note which zones connected, such as guest Wi-Fi to servers or IT to OT |
Cloud, People, and Physical Findings
| Finding | What It Means | Typical Severity | How to Read It |
|---|---|---|---|
| Public Cloud Storage | Storage buckets allow public read or write access | Critical to High | Check what files the bucket held and whether writing was possible |
| Overly Broad Cloud Permissions | Identity roles grant far more access than needed | High | Look for the role name and the actions it allowed beyond its job |
| Exposed Secrets | API keys, passwords, or tokens appear in code, logs, or files | Critical to High | Note where the secret was found and what it unlocks |
| Phishing Susceptibility | Employees clicked links or entered credentials in a simulation | Medium to High | Read the click rate, credential entry rate, and report rate by department |
| Physical Access Gaps | Testers entered restricted areas through doors, badges, or tailgating | Medium to High | Check which areas were reached and which control allowed entry |
Pen Test Report Example: An Annotated Finding
Here’s how one finding reads in a sample pen test report, with notes on what to look for:
| Field | Entry | What to Notice |
|---|---|---|
| Severity | Critical (CVSS 9.3) | Fix immediately |
| Affected Asset | staging.portal.example.com/search | A staging site exposed to the internet |
| Proof of Concept | Screenshots of the search field returning the app’s user table | Confirmed by exploitation |
| Business Impact | Path to patient billing records in production | Ties the flaw to real data |
| Remediation | Use parameterized queries, retire the staging site, and restrict access to test environments | Three specific actions |
Every pen test report sample from a strong provider follows this pattern: a specific asset, real evidence, business-level impact, and fix steps your team can act on right away.
How to Prioritize Remediation
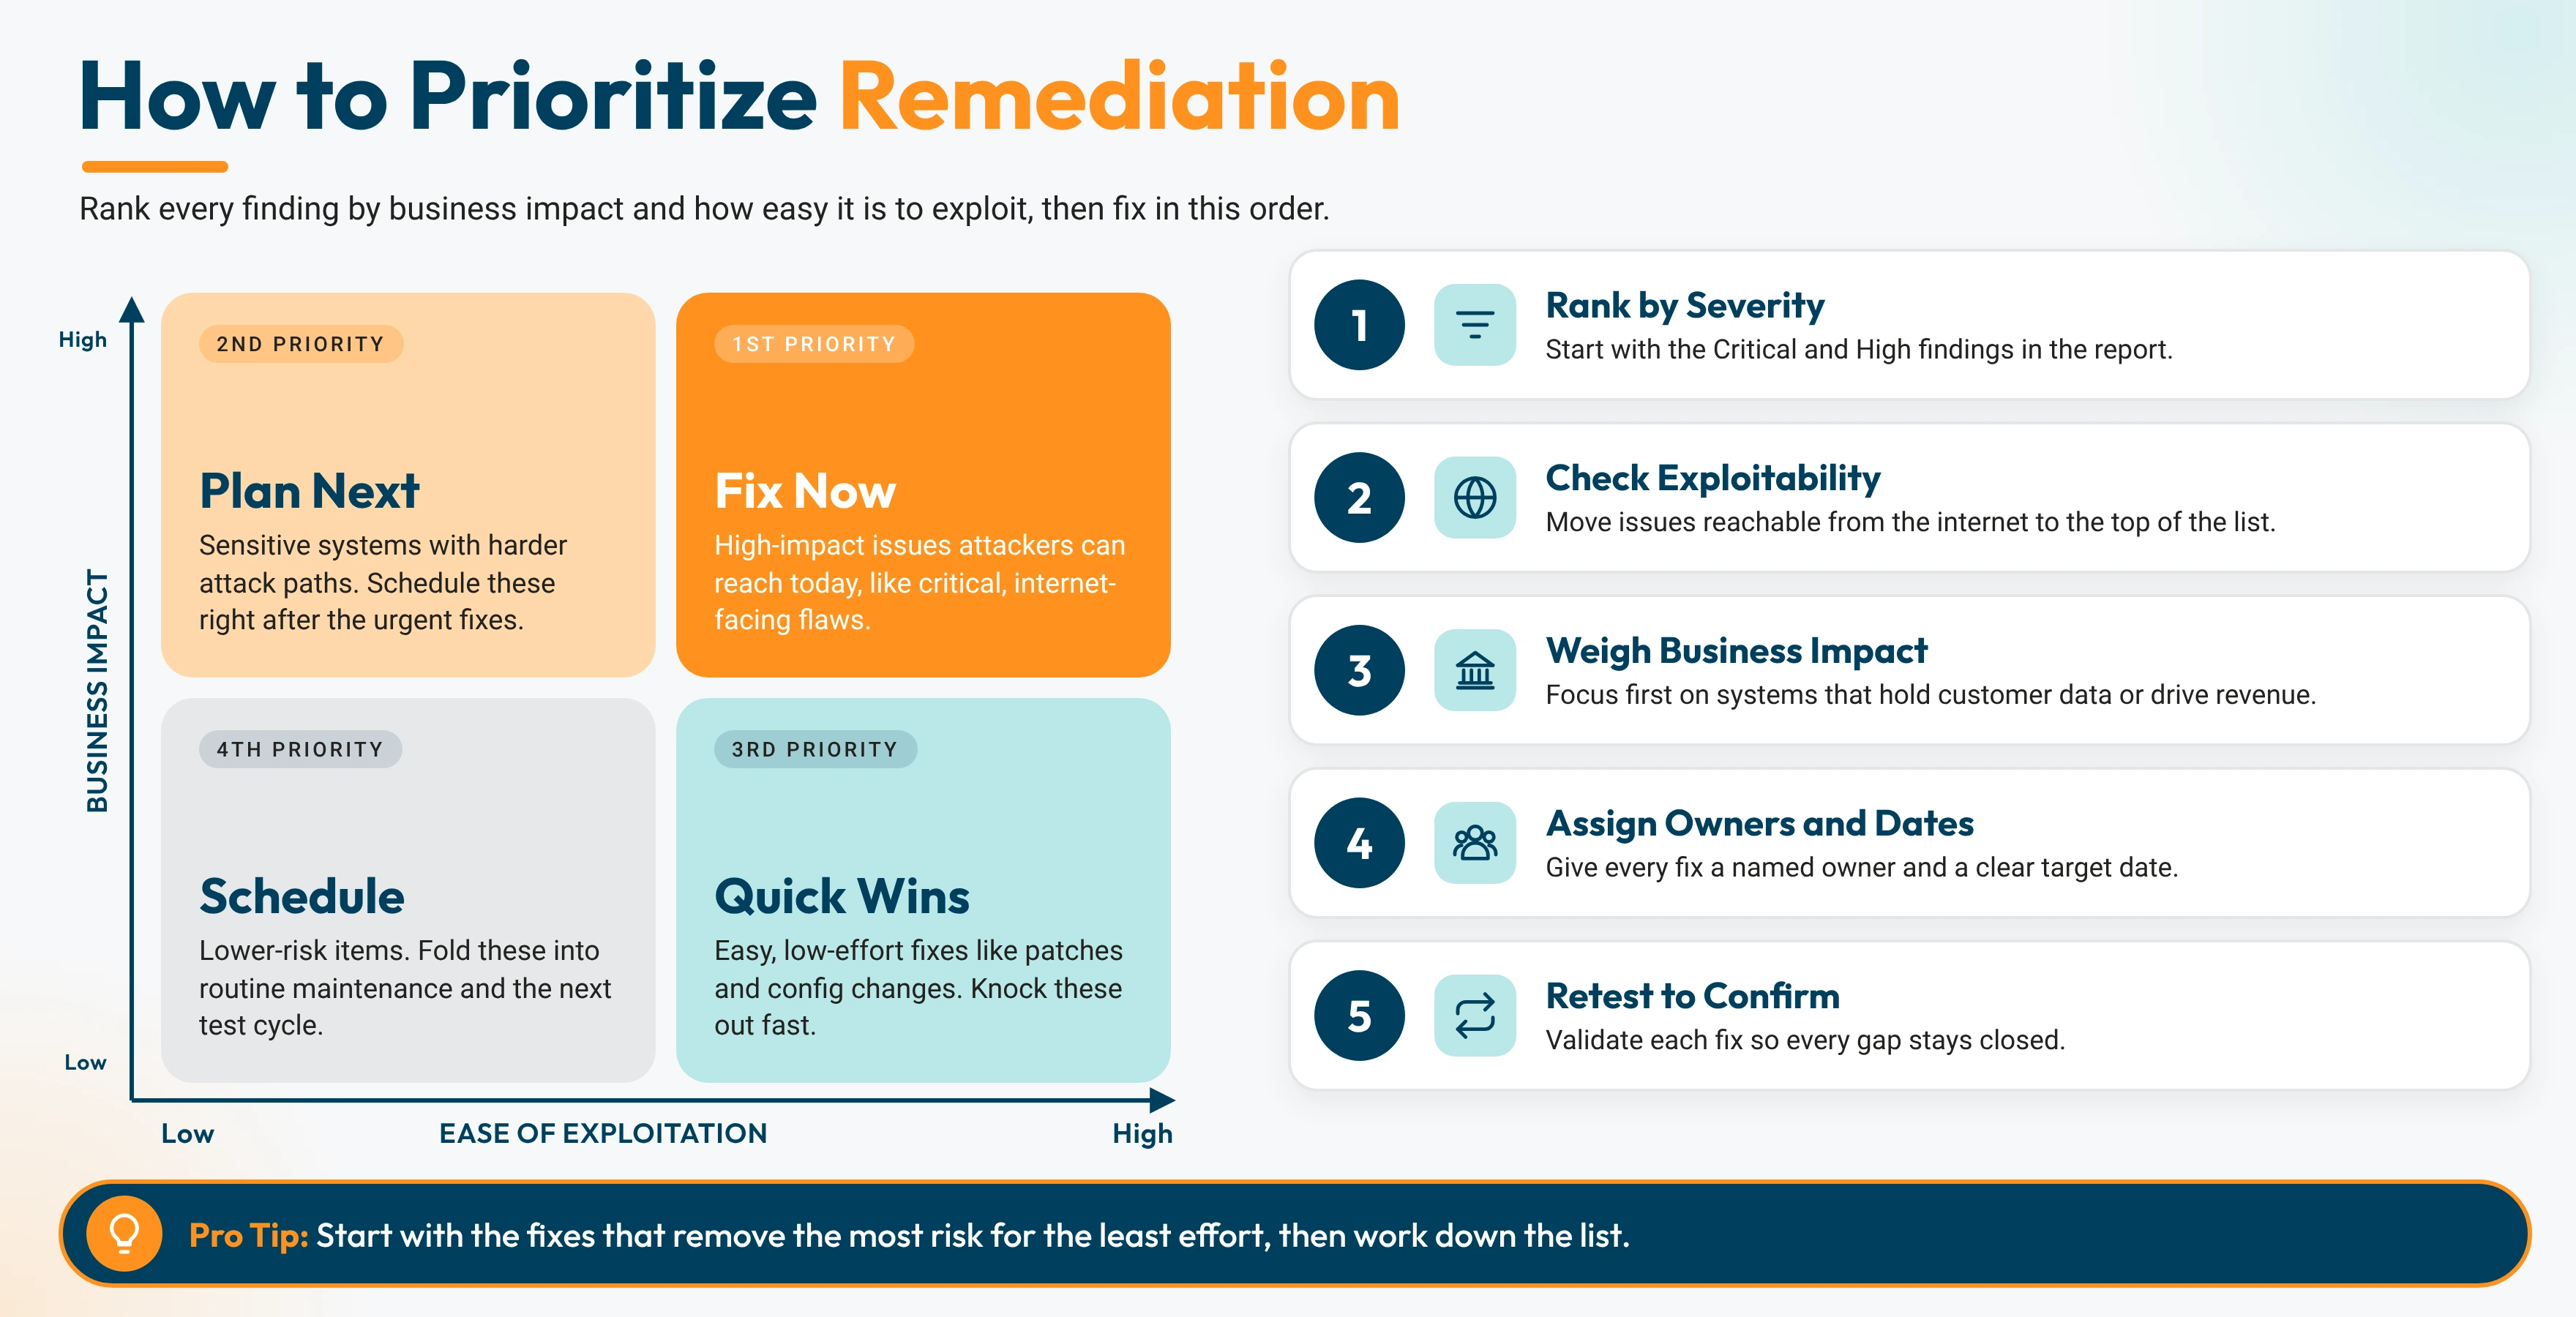
To prioritize pen test remediation, rank every finding by two things together: its severity and its business impact. Fix the findings that are both severe and exposed first, then work down to the rest with clear owners and dates. That turns a long list of findings into a fix plan your team can finish.
Step 1: Score Each Finding on Business Impact
Severity tells you how dangerous a flaw is. Business impact tells you how much it matters to your organization. Ask three questions about each finding:
- Is it exposed? Internet-facing systems carry more risk than internal test servers.
- What data sits behind it? Customer records, payment data, and health data raise the stakes.
- Does it link to other findings? A Medium finding that opens the door to a Critical one belongs at the top.
Step 2: Place Each Finding in a Priority Tier
| High Business Impact | Low Business Impact | |
|---|---|---|
| Critical or High Severity | P1: Fix now, within days | P2: Fix within weeks |
| Medium or Low Severity | P2: Fix within weeks | P3: Next maintenance cycle |
Step 3: Break Attack Chains First
Look at the attack narrative. If three findings link into one path to your customer database, fixing any one of them breaks the chain. Start with the quickest fix in the chain, then close the rest.
Step 4: Bundle the Quick Wins
Group fast configuration fixes, like security headers, default passwords, and old TLS settings, into a single ticket. One change window can close several findings at once.
Step 5: Assign Owners, Dates, and a Retest
Every finding needs a named owner, a target date, and a retest date. Track progress in one shared plan.
Pen Test Remediation Plan Template
| Finding ID | Finding | Severity | Business Impact | Priority | Owner | Fix | Target Date | Retest Date |
|---|---|---|---|---|---|---|---|---|
| PT-01 | SQL injection in staging search | Critical | Path to patient billing data | P1 | App Dev Lead | Retire staging site, use parameterized queries | [Date] | [Date] |
| PT-07 | Session tokens active after logout | Medium | Customer portal access | P2 | Web Team | End sessions server-side, shorten token life | [Date] | [Date] |
| PT-12 | Missing security headers | Low | Minimal | P3 | DevOps | Add headers in one config update | [Date] | [Date] |
Copy this layout into your ticketing tool or spreadsheet, and update the status after every fix and retest.
Pen Test Results: Retesting, Attestation, and Sharing
A retest confirms that every fix works, and proof of testing lets you share your pen test results safely with the people who ask for them.
How a Retest Works
Once your team deploys the fixes, send the tester a list of finding IDs to recheck. The tester reruns the original attack for each one and marks it as closed or still open. Most providers include one retest in the engagement, often within a set window after the report. The retest report then shows each finding’s updated status, so you have a clean, dated record of every fix.
How to Share Pen Test Results
Different audiences need different levels of detail:
| Audience | What to Share | Why |
|---|---|---|
| Customers and prospects | Attestation letter | Confirms the test took place and critical findings are closed, while technical details stay private |
| Auditors | Full report plus retest report | Shows scope, methodology, findings, and proof of each fix |
| Cyber insurers | Attestation letter or executive summary | Supports applications and renewals |
| Board and leadership | Executive summary plus retest status | Shows risk reduced over time |
An attestation letter is a short, signed summary from the testing provider. It typically lists the test dates, the scope, the methodology, and the current status of findings. It’s the fastest way to answer a security questionnaire.
What a Good Report Template Looks Like
A good pen testing report template gives every reader what they need in one consistent structure. It works the same way for every engagement, so you can compare results from one year to the next. Look for these signs of a strong report:
- A one-page executive summary with an overall risk rating, the worst-case path, and top priorities
- Clear scope and methodology that names every tested asset, the dates, and the frameworks followed
- An attack narrative that shows how individual findings connect into real attack paths
- A consistent layout for every finding: ID, title, CVSS severity, affected asset, proof of concept, business impact, and fix steps
- Business language alongside technical detail, so leaders and engineers read the same report
- A remediation roadmap grouped by priority
- Retest results and an attestation letter to close the loop
Tips From a Pen Tester
These details rarely make it into sales calls, but they make a big difference once the report lands:
- Ask for a draft report first. A short review window lets your team correct factual details, like an asset owner or a system name, before the final version goes to auditors.
- Watch how findings are grouped. One missing patch across 40 servers should appear as one finding with 40 affected assets. Strong reports group by root cause, which keeps the finding count honest and the fix list short.
- Request an export file. A CSV or JSON export of all findings lets your team load them straight into Jira or ServiceNow, which saves hours of copying.
- Check for tester IP addresses and timestamps. These let your security team match test activity against their own logs and see what their alerts caught.
- Look for a strengths section. Controls that held up, like MFA or endpoint protection, help you defend those budgets next year.
- Read the informational findings. These low-priority notes often point to the next year’s issues, such as software nearing end of support.
- Ask for retest results in the same report. A revised version that shows original findings and closed status side by side gives auditors one clean document.
- Request the attestation letter up front. Customer security questionnaires often arrive right after a test, so having the letter ready saves a scramble.
If a provider’s sample report checks every item on both lists, you can expect a report your whole team can use.
Pen Testing Report Template
Hold any provider’s report up against a proven structure. Our Pen Testing Report Template gives you:
- Every section of a strong report, from the executive summary to the attestation letter
- Fill-in templates with field-by-field notes on what good looks like
- A complete finding layout your engineers can work from on day one
- A ready-to-use attestation letter for customers and auditors
- A 15-point quality scorecard to grade any report before you sign off

Key Takeaways on Reading a Pen Testing Report
A pen testing report turns weeks of testing into one clear action plan. The executive summary tells leaders where the business stands. The technical findings show engineers exactly what to fix and how. The remediation plan and retest close the loop, and the attestation letter lets you share pen test results with customers, auditors, and insurers.
Three steps put your next report to work:
- Read by role: Leaders start with the executive summary, auditors check scope and retest results, and engineers go straight to the findings for their systems.
- Rank by risk: Combine severity with business impact, break attack chains first, and bundle quick wins into a single change window.
- Prove the fix: Retest every P1 and P2 finding, then request an attestation letter while the results are fresh.